How to Power LED Strip Correctly: A Complete Guide to Reliable Performance
Understanding LED Strip Voltage and Current Requirements
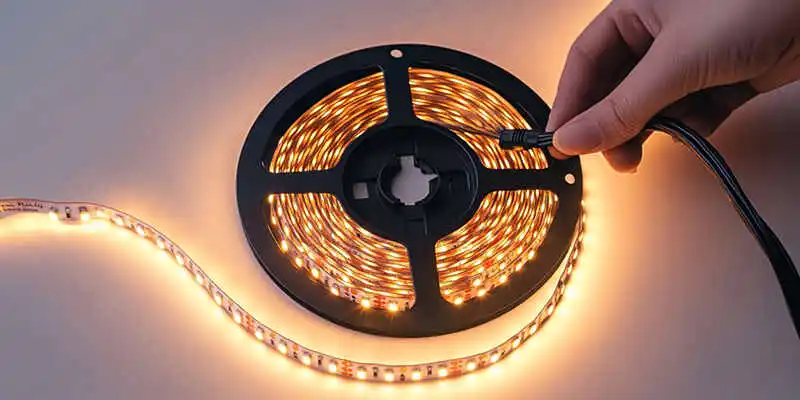
Before you power led strip, you need to get one thing straight: what voltage and current your LED strip needs. This isn’t something you guess—it’s typically printed right on the strip or listed in the product datasheet. For most general-purpose LED strips, you’ll see 5V, 12V, or 24V DC, with 12V and 24V being the most common in both residential and commercial use.
Here’s the rule you never break:
Always match your power supply’s output voltage to the strip’s required voltage. Hooking up a 12V strip to a 24V supply isn’t just a bad idea—it’ll fry the LEDs in seconds. And running a 24V strip on 12V? It simply won’t light up properly, if at all. Once you’ve confirmed the voltage, it’s time to calculate how much power your setup will draw. Check the wattage per meter (or per foot), which tells you how much energy the strip uses along its length. Multiply that number by how many meters you’re installing.
For example:
If you’re working with a strip rated at 7W/m, and you’re installing 5 meters, you’re looking at:
7 × 5 = 35W total power requirement, but don’t stop there—always add at least 20% headroom to account for real-world inefficiencies and ensure your power supply isn’t constantly maxed out. In this case, that means choosing a power supply rated for at least 42W.
This guide will walk you through everything you need to know about how to connect LED strips to a power supply—safely, correctly, and in a way that avoids common problems like voltage drop or overload
Choosing the Right Power Supply for Your LED Strip
Let me put it simply: if your power supply isn’t right, your LED strip will either underperform or burn out sooner than you think.
The first thing to check is voltage. It must match the strip, no exceptions. If you’re using a 24V strip, you feed it 24V. Not 12V. Not 19V. And certainly not “it’s close enough.” Wrong voltage is the fastest way to kill your strip—or at best, make it flicker or light up halfway.
Next, you figure out how much power you need. The strip tells you how many watts it pulls per meter. Multiply that by how many meters you’re installing. That’s your base number. But here’s the part most people get wrong: never run a power supply at 100% load.
You aim for about 70–80% load at most. If your strip draws 60 watts, then you could pick a 75W or 90W power supply. That extra 20–30% margin gives the supply breathing room. It stays cooler, lasts longer, and doesn’t shut down or dim out under load.
Now, don’t forget the environment. If it’s going in a cabinet or a clean indoor space, fine—standard supply will do. But if you’re mounting it near a bathroom ceiling, under a kitchen counter, or outside? Use something rated IP65 or higher. Moisture kills electronics fast, even a little bit of steam.
Last thing: if dimming is part of the plan, make sure the PSU and dimmer/controller are compatible. That means either getting a dimmable driver or matching your controller to a non-dimming supply. Mismatches there cause all kinds of headaches—jerky dimming, buzzing, or complete failure.
In short:
- Match the voltage.
- Over-size the power supply by at least 20%.
- Use the right IP rating for the space.
- Don’t assume all dimmers work with all supplies.
Get these right, and you won’t be calling tech support in two weeks asking why half your strip isn’t lighting up.
How to Connect LED Strips to a Power Supply (Safely and Correctly)
Here’s where a lot of good installs go wrong—not because the LED strip or power supply failed, but because someone cheaped out on the wiring.
Wire gauge matters. A lot.
Too thin, and you get a voltage drop. Your LEDs start bright on one end and dim halfway through. Seen it more times than I can count. If you’re running anything over 3–5 meters, especially on a 12V strip, voltage drop becomes a real issue. I usually go with 18AWG for short runs under 3 meters, 16AWG for mid-length, and 14AWG or even thicker for longer or higher-wattage installs. Don’t guess—use a voltage drop calculator if you’re unsure. It’s worth the extra five minutes.
Keep your wire runs as short and direct as possible.
Long loops, coiled wires, or unnecessary extensions just add resistance and risk. I’ve been called in to troubleshoot flickering strips, only to find the client ran 10 meters of wire when they could’ve run three.
Connectors can be convenient, but not always reliable.
Snap-on connectors are fine for quick tests or low-stress areas, but for a permanent job, I prefer soldering. Solder joints don’t come loose, they don’t corrode easily, and they don’t fail when the cabinet gets bumped or the weather changes. If you absolutely must use connectors, make sure they’re rated for the current you’re pulling, and get ones with locking clips or waterproof seals if needed.
And here’s something people don’t talk about enough: insulation and protection. If your wires are running behind a wall or near metal framing, use heat-shrink tubing or conduit. One sharp edge is all it takes to short your system and possibly fry your power supply.
Lastly, label your wires if you’re doing a big project. I’ve wasted hours trying to trace mystery wires because someone didn’t bother to mark “+” or “−” at both ends. A little tape and a Sharpie save a lot of headaches later.
In short:
- Use a thick enough wire to avoid a voltage drop
- Keep runs short and clean
- Prefer solder over push connectors for anything permanent
- Protect your wires and label them clearly
- Solid wiring isn’t flashy, but it’s what makes your whole lighting setup reliable for the long haul.
Managing Voltage Drop in Long LED Strip Runs
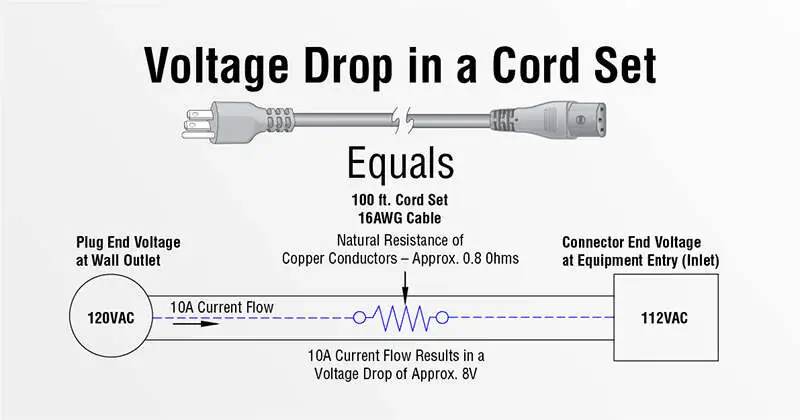
Voltage drop is a common challenge in long LED strip installations, often causing noticeable dimming or color shifts the farther you get from the power source. The issue is more pronounced with lower voltage strips—12V LED strips typically begin to show voltage drop after about 5 meters, while 24V LED strips can usually go up to 10 meters before any degradation appears.
To mitigate voltage drop effectively, consider the following strategies:
Power Injection
For extended runs, power injection is essential. This means supplying voltage to multiple points along the strip instead of just one end. Common methods include:
End-to-end injection: power at both ends of the strip.
Midpoint injection: power fed at the center.
Parallel injection: multiple power taps along the run.
As a rule of thumb, inject power every 3–5 meters for 12V strips and every 5–10 meters for 24V strips—or follow the manufacturer’s recommendations if available. This helps maintain consistent voltage and brightness across the full length.
Use Thicker Wire
Longer wire runs introduce more resistance. Using a lower-gauge (thicker) wire for both the main power feed and injection lines helps minimize voltage loss, especially in high-power or high-current applications.
Avoid Long Daisy Chains
Instead of wiring LED strips in a long daisy chain, break the installation into shorter segments. Power each section independently or from a central point using parallel wiring. This reduces the load on any single wire path and improves performance stability.
Choose Higher Voltage Strips
When working on large-scale or high-density installations, opting for higher-voltage strips, like 24V or even 48V, can significantly reduce current draw and extend usable run length without visible voltage drop. This is especially useful in architectural or commercial-grade projects.
Safety Precautions and Best Practices
Safety is paramount in any LED strip installation. The following best practices are often overlooked but make a big difference in both performance and peace of mind.
Certified Components Only
Always choose UL, CE, or ETL power supplies and accessories. These certifications ensure the products meet strict electrical safety standards, which can help minimize the risk of failure and enhance overall reliability.
Fusing and Overcurrent Protection
Even if your power supply includes built-in protection, install a fast-blow inline fuse rated slightly above your LED strip’s maximum current. This extra layer of safety helps isolate faults and prevents overheating if a short circuit occurs.
Heat Management
High-power LED strips generate heat. To avoid thermal stress or fire hazards:
- Mount strips on aluminum channels or heat sinks to dissipate heat
- Never enclose strips in airtight or insulated spaces.
- Avoid installing directly on wood or flammable surfaces without a thermal barrier.
Routine Inspection
Periodically inspect your installation:
- Look for discoloration, loose wires, or cracked insulation.
- Check connectors and solder points for corrosion or fatigue.
These checks can prevent bigger issues later.
Fire Safety Basics
- Maintain airflow around high-density or high-wattage strips.
- Keep all components away from curtains, insulation foam, or paper-based surfaces.
- For installations in ceilings or cabinetry, ensure ventilation is accounted for during design.
Real-World Power Configurations
Let’s put the theory into practice. Here are some common LED strip setups and how to wire them correctly.
Single Run – 5m 12V/24V Strip with One Power End
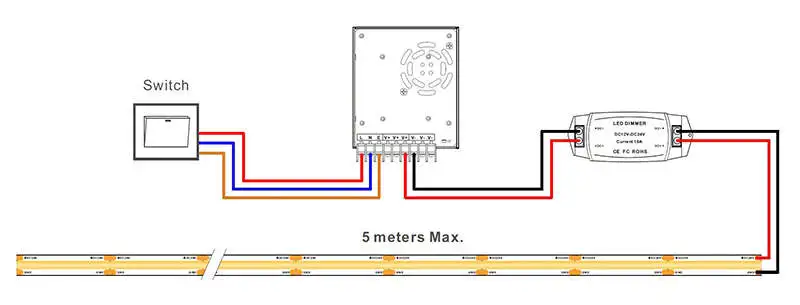
This is one of the most common setups for indoor use, like under cabinets or behind a TV.
Power supply: Choose a 12V unit rated at least 20–30% above your strip’s total wattage. For example, if your strip draws 36W, go for a 45W or 60W power supply.
Wiring: Keep the wire run from the power supply to the strip as short as possible. Use 18 AWG wire for good current flow and minimal loss.
Tip: Test the full setup before mounting anything permanently.
Long Run Connection – 10-20m LED Strip
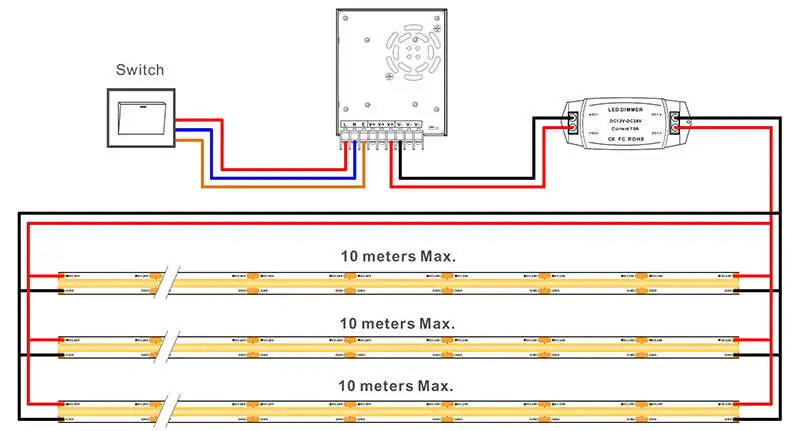
With longer strips, voltage drop becomes a real issue, even at 24V.
Power injection: Add power feeds every 5 to 10 meters. You can inject power from both ends or add a tap in the middle.
Wiring: Use thicker wire—14 AWG or better—for injection points. This helps reduce voltage loss.
Power supply: You can either use a larger supply with multiple outputs or split the load across two separate supplies.
Tip: Always check the brightness consistency across the entire length after wiring.
Connecting Multiple Strips to One Power Supply
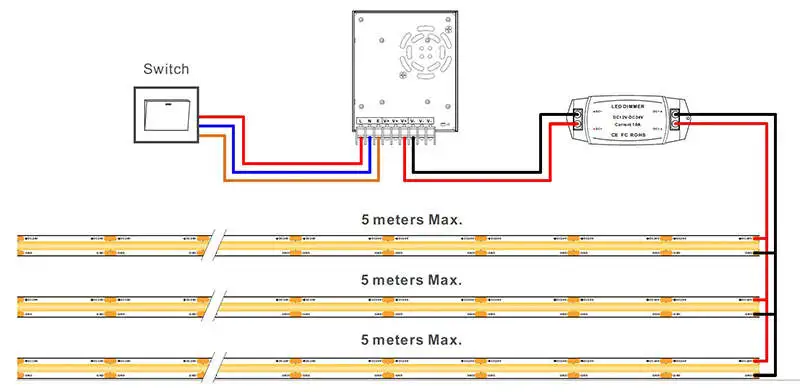
Check total wattage: Add up the power draw of all strips and choose a power supply with at least 20–30% headroom.
Parallel connection: Connect each strip’s positive and negative leads to the same terminals or via a terminal block.
Avoid daisy-chaining: Connecting strips end-to-end can cause brightness loss on the far end due to voltage drop.
Use repeaters for RGB or smart strips: When controlling multiple RGB zones, use signal repeaters to keep colors in sync across all strips.
Troubleshooting Common Issues
Even with a well-planned setup, things don’t always go perfectly. Here’s how to handle the most common issues you might run into when installing or running LED strip lights:
Flickering or Blinking Strips
If your LED strip starts flickering, it usually means the voltage isn’t steady or there’s some interference messing with the signal. Sometimes, it’s because the power supply is working too hard or a connection isn’t tight enough.
First, check your power supply. Make sure it’s the right size for your LED strip—if it’s too weak or acting up, flickering is almost guaranteed.
Next, look over all your connectors and solder joints. A loose wire or a bad crimp can cause the lights to cut in and out, especially if you move or bump the strip.
And if you’re using RGB or addressable strips, don’t forget the controller. Sometimes, a weak signal or a glitch in the software can mess with the lights and cause flickering.
Dim or Uneven Lighting
If your LED strip is noticeably dimmer at the far end—or shows a color gradient—it’s probably suffering from voltage drop.
How to fix it:
- Inject power at additional points, especially for runs over 5 meters (12V) or 10 meters (24V).
- Use thicker wire (14 AWG or better) for long-distance runs to reduce resistance.
- Break long runs into smaller segments, each powered independently or in parallel from a central supply.
The Entire Strip is Not Turning On
This could be as simple as a power connection issue or as serious as a dead power supply.
- Test the voltage output from the power supply using a multimeter. If there’s no output, replace the power supply.
- Check polarity on the input wires—reversed polarity can prevent the strip from lighting up or cause internal damage.
- Confirm the controller function if one is present. A controller failure (or wrong mode selection) may keep the strip off even when power is available.
Overheating or Burned Sections
Overheating can happen if the strip is operating beyond its rated current, installed in a poorly ventilated area, or mounted on an insulating surface.
How to fix it:
- Verify current draw and ensure it’s within the strip’s and power supply’s rated limits.
- Use aluminum channels for passive heat dissipation, especially for high-output or dense LED strips.
- Avoid enclosing strips in small, sealed compartments unless proper ventilation or active cooling is provided.
Color Shifting or Wrong Colors
This is often a sign of a poor connection, mismatched controller settings, or faulty signal transmission, especially with RGB/RGBW or digital strips.
How to fix it:
- Reseat connectors and ensure all R, G, B, (and W) pins are making full contact.
- Match your controller to the strip type, especially if using addressable formats like WS2812B, SK6812, or DMX.
- Use shielded cables or shorter wire runs if you suspect data signal degradation in digital setups.
Conclusion:
Connecting LED strips to power might look straightforward at first, but as we’ve seen, it’s more than just plugging things in. From picking the right power supply and wire gauge to managing voltage drop and ensuring safe connections, every detail counts.
Whether you’re lighting a kitchen countertop or wiring up dozens of meters for a commercial project, taking the time to understand power needs and wiring best practices will save you a lot of trouble later. When powered correctly, your LED strips last longer, shine brighter, and perform exactly as expected.
So, plan carefully, double-check your calculations, and never skimp on quality or safety. Choosing high-quality components from the start—like certified power supplies and professionally-built LED strips—can help you avoid most of the common headaches. At SunroLEDs, we design and manufacture LED strip solutions that meet rigorous performance and safety standards, so you can focus on the lighting design, not the wiring problems.
With the right setup and the right products, your LED strip installation won’t just look fantastic—it’ll run smoothly and reliably for years to come.