LED Strip Light Voltage Drop: What It Is and How to Fix It

When setting up LED strip lights, one common but often overlooked issue is voltage drop. If you’ve ever noticed that your LED strips appear dimmer at the far end compared to the beginning, you’re experiencing this phenomenon. Voltage drop can lead to uneven brightness, distorted colors, and even a shorter lifespan for your LEDs—but what causes it, and how can you prevent it?
For homeowners, designers, and lighting professionals, understanding voltage drop is crucial for achieving high-quality, uniform illumination. A well-planned LED strip installation ensures not only visual consistency but also energy efficiency and long-term reliability.
In this article, we’ll break down the science behind voltage drop, show you how to calculate it, and provide expert solutions to minimize its impact. Whether you’re working on a small accent lighting project or a large-scale commercial installation, these insights will help you get the most out of your LED strip lights.
What is Voltage Drop in LED Strip Lights?
Voltage drop is a common issue in LED lighting systems that can significantly affect both performance and lifespan. It occurs when electrical resistance within the wiring and circuit components causes a gradual loss of voltage as current travels through the LED strip. In simple terms, as electricity moves along the strip, some of its energy is lost due to resistance, resulting in lower voltage at the far end. This often leads to an uneven brightness effect, where LEDs near the power source appear brighter than those further away.
This issue is especially noticeable in longer LED strip installations, where the voltage drop becomes more pronounced over distance. If not properly managed, it can compromise the overall lighting quality, reduce efficiency, and shorten the lifespan of your LEDs. Understanding what causes voltage drop and how to mitigate it is essential for achieving consistent, high-quality illumination in any LED lighting project.
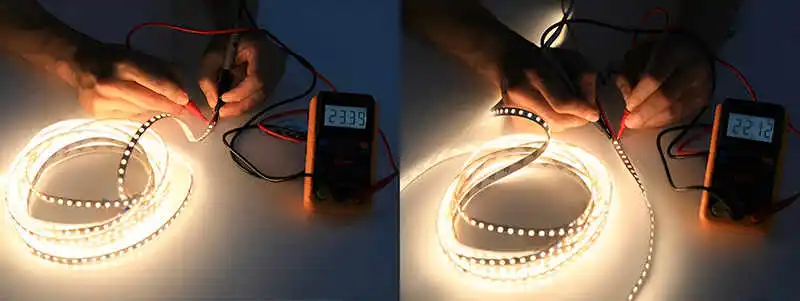
What Are the Impacts of Voltage Drop?
Uneven Brightness
The most visible effect is a gradient of brightness, with LEDs near the power source appearing brighter than those at the end. This undermines the purpose of uniform decorative or LED lighting.
Color Inconsistency (RGB Strips)
In RGB or RGBW strips, voltage drop can alter color accuracy. For example, red LEDs (which operate at lower forward voltages) may dominate at the strip’s end, skewing the intended color mix.
Reduce Lifespan
LED Strip operating below their rated voltage draws uneven current, leading to premature failure. Over time, this stress can degrade the entire strip.

What Causes Voltage Drop in LED Strip Lighting?
Voltage drop in LED strip lighting can lead to uneven brightness, color shifting, and overall poor performance. The good news is that there are several effective ways to prevent and fix voltage drop, ensuring your LEDs maintain consistent illumination from start to finish. Here are the best strategies to keep your lighting system running smoothly.
1.Length of the LED Strip
The longer the LED strip, the greater the resistance in the circuit. Electricity weakens as it travels through the copper traces inside the strip, causing a noticeable voltage drop over extended runs. This is especially true for 12V LED strips, which experience more voltage loss per foot compared to higher-voltage options like 24V or 48V.
2. Wire Gauge (Thickness)
The thickness of the wires connecting your LED strip to the power supply plays a crucial role in voltage drop. Thin wires have higher resistance, making it harder for electricity to flow efficiently. This resistance leads to more power loss and dimming over long distances. Using thicker wires with lower resistance helps reduce voltage drop and maintain consistent brightness
3. Low Operating Voltage
Lower-voltage LED strips (such as 12V) are more susceptible to voltage drop than higher-voltage options. Since voltage drop is measured as a percentage of the total supply voltage, a small reduction has a much greater impact on a 12V system than on a 24V or 48V system. That’s why professionals often recommend using 24V LED strips for longer runs.
4.Poor Electrical Connections
Loose, corroded, or low-quality connectors can increase resistance, leading to power loss. Cheap connectors, poorly crimped wires, or solder joints that aren’t fully secured can all introduce additional resistance points that contribute to voltage drop. Ensuring tight, high-quality electrical connections is essential for optimal LED performance
5. Excessive Power Load
If your LED strip is drawing more power than the power supply can handle, the voltage drop becomes more pronounced. Each LED chip adds to the total current demand, and if the power supply is insufficient, the voltage reaching the LEDs will decrease. Using an appropriately sized power supply with enough wattage capacity prevents this issue
6. LED Strip quality and PCB Design
Not all LED strips are built the same. High-quality strips use wider copper traces on the PCB (Printed Circuit Board) to allow for better electrical conductivity and lower resistance. Cheaper strips often have thinner copper layers, which increase resistance and result in a greater voltage drop. Choosing premium LED strips with higher copper thickness can significantly reduce this effect.
Understanding these causes is the first step in addressing voltage drop. In the next section, we’ll go over practical solutions and best practices to minimize voltage drop and ensure consistent brightness throughout your LED lighting installation.
How to Calculate Voltage Drop in LED Strips?
To calculate voltage drop, you need to consider the current (measured in amps) and the resistance of the wire or LED strip (measured in ohms). The LED strip voltage drop formula can be used to estimate the voltage loss:
Voltage Drop (V) = Current (A) × Resistance (Ω) × Length (m).
Alternatively, an LED strip voltage drop calculator can simplify this process, providing quick and accurate estimations to adjust your installation.
For example, Take a 12V LED strip for an example, the specifications state that the LED Tape Light uses 2.09 Watts per foot. If you have a maximum run of 40 feet, you’ll require at least 83.6 Watts to properly power the LED tape light array (2.09 Watts per foot x 40 feet = 83.6 Watts). You’ll then need to identify the proper wire gauge to run between the driver and the LED luminaire based on the distance
How to Prevent & Fix the Voltage Drop in LED Strips?
Voltage drop in LED strip lighting can lead to uneven brightness, color shifting, and overall poor performance. The good news is that there are several effective ways to prevent and fix voltage drop, ensuring your LEDs maintain consistent illumination from start to finish. Here are the best strategies to keep your lighting system running smoothly.
Use a Higher Voltage LED Strip
One of the simplest ways to reduce voltage drop is to choose a higher-voltage LED strip like 24V, 36V or 48V LED strips. Selecting 24V/48V instead of 12V strips can help mitigate voltage drop. Typically, 24V strips provide the same light output but with half the current. This is because 12V LED strips lose voltage faster than 24V/48V strip lights, so if you are looking to make longer runs over 40 feet, 24V/48V strips are recommended. Higher voltage systems (24V over 12V) typically experience less voltage drop over long runs.
Considering Constant Current LED Strips
Unlike traditional constant voltage LED strips, constant current LED strips can provide a steady current across the entire strip, ensuring uniform brightness from start to end. This type of strip incorporates built-in current regulation, preventing voltage fluctuations and maintaining consistent light output, even in longer runs.
Reduce Strip Length and Use Multiple Power Supplies
Reducing the length of the LED strip per power supply or strategically placing multiple power supplies along the strip can significantly minimize voltage drop. For installations that stay within the maximum recommended run, simply connect the power supply, LED strip, and any necessary accessories for a seamless setup. However, if your project requires exceeding the maximum run, positioning the power supply near the center of the strip can effectively extend the usable length. This approach allows you to power both ends independently, reducing resistance and ensuring even brightness throughout the strip.
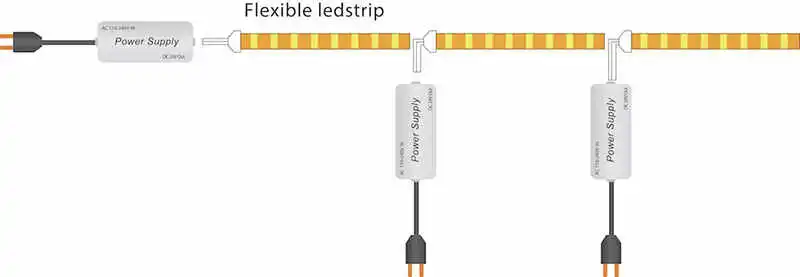
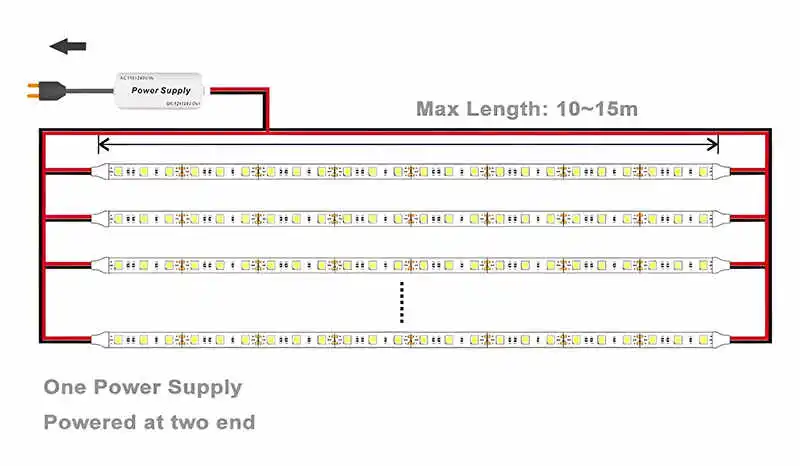
Connect the Power Supply to Both Ends of the LED Strip
By wiring the power supply to both ends of the LED strip, you create a more balanced voltage distribution across the strip. This method effectively prevents one end from appearing dimmer than the other, ensuring uniform brightness.
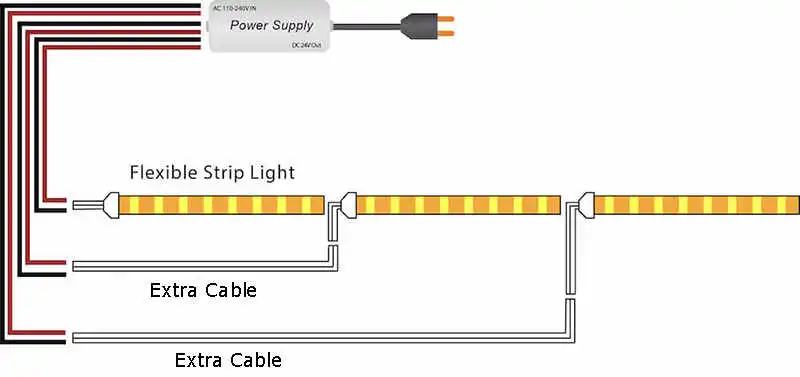
Add Power Injection
For extended LED strip runs, power injection is a crucial technique to maintain voltage stability. This involves supplying additional power at different points along the strip—such as the middle or both ends—to counteract voltage drop. Power injection is especially useful for high-power LED strips or when a single power supply is insufficient to sustain a long run. By injecting power at key points, you reinforce the voltage supply, ensuring uniform brightness from start to finish
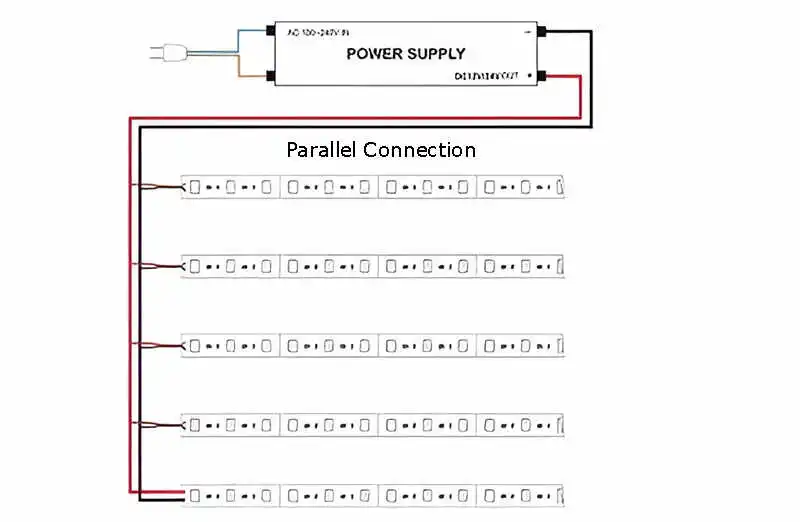
Use Parallel Connections
Instead of wiring LED strips in series (daisy-chaining), which increases resistance and voltage drop, use parallel wiring. This ensures that each section of the strip gets power directly from the power supply, maintaining uniform brightness across all sections.
Upgrade Thicker Gauge Wire and Strip quality
Increasing the wire gauge for connecting wires is essential for reducing voltage drop. Using wires with sufficient thickness to carry the current without a significant voltage drop is crucial. Consult wire gauge charts to determine the appropriate size for your LED strip installation.
Similarly, increasing the thickness of copper on the PCB follows the same theory as using a proper wire gauge. Opt for LED strips with higher copper thickness (2.0 oz or 3.0 oz) to allow more current flow through the circuit
Optimize Wiring Layout
Make sure all connections are secure, clean, and free of corrosion to minimize resistance and voltage drop. Poor connections can increase resistance in the circuit, leading to significant voltage drop.
Utilize Voltage Amplifiers
Voltage amplifiers can boost the voltage of the LED strips, compensating for any drop along the length of the circuit. This is particularly useful for RGB strips, where an amplifier is needed because each wire on a multi-color strip needs its voltage boosted
Choose a High-Quality Power Supply
Selecting a high-efficiency, well-regulated power supply with sufficient wattage ensures that the LED strips receive a stable voltage. A power supply with an adequate margin above the total wattage of the strips prevents overloading and voltage fluctuations.
Conclusion
Voltage drop is a common challenge when working with LED strip lights, but with the right knowledge and planning, it can be effectively managed—or even eliminated. Understanding the causes of voltage drop, calculating its impact, and implementing the right solutions will ensure your LED lighting system performs optimally with consistent brightness and efficiency.
The key to preventing voltage drop lies in choosing the right LED strips and power supply, using high-quality materials, and following proper wiring practices. Whether you’re designing a small accent lighting setup or a large-scale commercial installation, keeping voltage drop in check will maximize the lifespan and performance of your LEDs.
If you’re experiencing issues with dimming or uneven lighting, don’t just assume it’s a faulty LED strip—check your wiring, power supply, and installation method. Upgrading to a higher voltage LED strip, using thicker wires, or strategically injecting power at multiple points can significantly improve performance.
At SunroLEDs, we provide premium LED strip solutions designed to minimize voltage drop while delivering high brightness, efficiency, and durability. If you’re looking for expert guidance on your next lighting project, feel free to reach out—we’re here to help you create a flawless lighting experience.