LED Strip Installation Guide: Step-by-Step Instructions for a Flawless Setup

Introduction
Installing LED strip lights is an easy and impactful way to elevate the look and functionality of both residential and commercial spaces. But achieving a clean, professional result takes more than just sticking lights on a surface—it requires proper planning, precise execution, and attention to safety. This comprehensive step-by-step guide walks you through every stage of the process, from initial layout and surface prep to wiring, mounting, and troubleshooting, ensuring your installation is both beautiful and reliable.
Step 1: Planning Like a Pro – The Foundation of Success
A successful LED strip installation doesn’t start with peeling the adhesive — it starts with smart planning. By mapping out your layout and calculating power needs in advance, you’ll avoid dimming, voltage drops, or messy cable runs later on.
1. Measure First, Not Last
Grab a tape measure and check the full length of the surface you want to light. Go edge to edge, include corners and curves, and make a quick sketch if needed. If you’re planning under-cabinet lights, measure each cabinet section separately.
Leave a bit of extra length for connectors or changes during installation—better to trim than to come up short.
2. Know Where You Can Cut
LED strips can’t be cut just anywhere. Look for the tiny scissors icon or copper pads printed on the strip—those are your safe cut points.
- 12V strips: usually every 3 LEDs
- 24V strips: every 6 LEDs
- COB strips: more frequent cut points, great for precise installs
Avoid cutting through the copper pads, or you’ll damage the circuit.
3. Calculate Power Requirements (It’s Easier Than You Think)
Now let’s do some quick math. Each LED strip draws a certain number of watts per meter.
You’ll need to know the total power draw to choose the right driver or power supply.
Here’s the formula:
Total watts = (watts/meter) × (total meters), Then add 20% extra capacity to avoid overloading.
For Example: A 10W/m strip across 6 meters = 60W, then choose at least a 72W driver.
Always choose a driver with at least 20% more power than required to ensure safety and longevity..
4. Plan for Voltage Drop
If your project is more than 5 meters, the LED Strip voltage drop can cause the strip to dim at the far end.
To avoid that:
- Use 24V or 48V strips for better current stability
- Inject power at both ends or every few meters
- Keep wiring short and use thicker gauge wire when needed
For extra-long installations, consider constant current LED Strip —they’re built to maintain brightness across longer distances.
5. Decide the control method
Are you using basic white strips, RGB color-changing ones, or even smart strips? That’ll determine your controller setup.
- Single color: inline dimmers or wall-mounted switches
- RGB / RGBW: remote, app-based, or DMX controllers
- Smart control: Wi-Fi, Zigbee, Alexa or Google Assistant integration
Make sure your controller matches the voltage and type of strip you’re using—and plan where it will go.
Step 2: Preparation LED Strip Installation Tool Kit
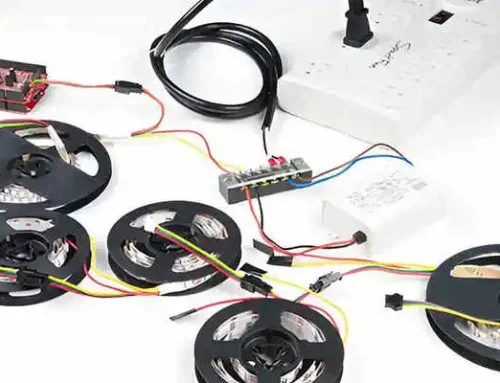
Before you start unrolling your LED strip or peeling off any adhesive, make sure you’ve got the right tools at arm’s reach. Having everything ready avoids interruptions and helps the installation go smoothly from start to finish.
Here’s what you’ll need:
✔️ LED strip (pre-selected for length, voltage, and color)
✔️ Power supply (matched to your strip’s total wattage and voltage)
✔️ LED controller or dimmer (if using RGB, RGBW, or adjustable white)
✔️ Connectors or soldering kit (depending on your setup)
✔️Scissors or a precision knife (for cutting strips at marked points)
✔️Multimeter (to check voltage if troubleshooting)
✔️Screwdriver or Power drill (if mounting)
✔️ Measuring tape and pencil or chalk (for marking installation points)
✔️ Wire strippers and electrical tape
✔️ Optional: Aluminum channels or mounting clips for a cleaner finish
✔️ Optional: Extension wires for jumps or longer runs
Step 3: Clean Surface
Did you know that over 60% of LED strip lighting failures are caused by adhesive issues? A poor bonding surface is often the hidden culprit behind falling or flickering strips — and it’s completely preventable.
Here’s how to prep your mounting surface:
- Wipe down the area with a dry microfiber cloth to remove dust and loose particles.
- Use isopropyl alcohol (70–90%) on a clean cloth to remove oils, fingerprints, and residues — especially important in kitchens or near appliances.
- Let it dry completely. Adhesive won’t bond properly on a damp or tacky surface.
- Installing on rough or uneven surfaces? Reinforce the strip with mounting clips every 30cm. Secure them using 3M VHB tape for a clean finish, or stainless steel screws for permanent installations.
Step 4: Planning the Wiring Route and Power Placement
With your layout confirmed and surfaces cleaned, just take a moment to plan your layout. A simple sketch of your space will save you time and costly mistakes.
Map out the LED strip route and wiring, taking note of any corners, gaps, or obstacles. These spots may require special connectors or flexible jumper cables.
Choose the location of your power supply and LED controller. such as Cabinets, closets, or utility spaces — just ensure they’re easily accessible and well-ventilated.
Make sure there’s a nearby electrical outlet, or plan to extend the power cable if necessary.
To keep things tidy, plan how you’ll conceal the wiring. Use cable raceways, conduits, or route wires behind furniture or along trim edges.
Step 5: Cutting LED Strip Lights to Length
Once your layout is finalized and you find the strip is longer than the installation’s, it could be cut. Just be cautious that the LED strip must be cut only at designated cut points, typically marked with a small scissor icon or visible copper pads.
Double-Check Before You Cut
- Disconnect the strip from power to avoid any risk of shock or short-circuit.
- Use sharp scissors or a precision knife, and make a clean cut right through the center of the copper pads.
- Avoid nicking the surrounding components or damaging the circuit, especially important with high-density LED strips.
- Double-check your measurements before each cut. LED strips are not self-healing — once cut, it can’t be undone.
Step 6: Connecting and Reconnecting LED Strips
Once your LED strips are cut to size, it’s time to connect them, especially at corners, bends, or across gaps. Most LED strip systems support plug-in connectors, snap-on terminals, or soldered joints. The right method depends on your project’s complexity and your skill level.
Meanwhile, you always match voltage (12V, 24V, or 48V) and polarity (+ / -) when connecting different sections. If you choose to solder wires directly, make sure your solder joints are clean, and use a heat-shrink cap for insulation.
For waterproof LED Strip used in humid or dusty environments, after cutting the strip, better to reseal the cut end with silicone glue or waterproof covers to maintain the IP Rating.
Step 7: Dry Run and Functionality Testing
Before you peel the adhesive or secure a single clip, pause. This dry run phase is your opportunity to verify everything is working before you make anything permanent. It’s the difference between a seamless setup and hours of frustrating rework.
What to Do
Temporarily connect all LED strip segments, power supply, controller (if any), and any sensors or dimmers.
Power on the system to check:
- Brightness consistency across all segments
- Color accuracy (for RGB/CCT strips)
- Responsive control via remote, app, or wall switch
- No flickering or dead zones
⚠️ What to Watch Out For:
- Polarity issues: If one segment doesn’t light up, double-check that the + and – lines are correctly aligned.
- Loose connectors: Solderless clips must snap tightly into place. If needed, use electrical tape for temporary stabilization during testing.
- Power limitations: Make sure your power supply isn’t overloaded—if brightness drops toward the end, you may need power injection or a higher wattage driver.
Step 8: Mounting the LED Strip Lights
Now it’s time to place your strips. Peel off the adhesive tape from the back, and press the strip firmly along the planned path. Move slowly and apply even pressure to help the adhesive stick properly.
If you’re installing long runs, pause every meter or so to smooth out any bubbles or slack. On curved or vertical surfaces, add mounting clips every 30–50cm for extra grip, especially in outdoor or high-heat areas.
💡 Pro tip: For LED strips with heavier silicone coatings or installed upside down (e.g., ceiling features), adhesive alone may not hold over time—Moutning clips are a must.
Step 9: Final Connections and Powering Up
Before sealing up your setup, do a full system check. Connect your LED strip to the power supply, ensure the correct voltage output (e.g., 12V or 24V), and plug the power supply into the outlet.
If you’re using a controller or dimmer, install it between the strip and power supply. Turn on the power and watch for:
- All LEDs are lighting up evenly
- No flickering, dim sections, or overheating
- Smooth color transitions (for RGB or CCT strips)
If something doesn’t look right, recheck the wiring polarity, connectors, and power supply rating
⚠️ Always use a certified power supply with over-voltage and short-circuit protection to protect your investment.
Step 10: Troubleshooting and Final Inspection
Even after a successful installation, it still needs to do a final inspection, it is very important to ensure long-term performance and prevent future issues
Go through this simple checklist after powering on your LED strip installation:
Uniform Brightness: Ensure all sections of the strip light up evenly. Dim or flickering areas may indicate voltage drop, poor soldering, or loose connections.
Color Accuracy: For RGB or RGBW strips, test all color modes. If colors are off, double-check pin alignment or controller settings.
Secure Connections: Tug lightly on connectors and wires to confirm they are secure. Re-seat any that feel loose or cause inconsistent lighting.
Heat Issues: After 10–15 minutes of operation, check for overheating. If strips feel hot to the touch, ensure adequate ventilation or use aluminum channels to dissipate heat.
Controller & Dimmer Response: Test your remote, app, or smart system response time. Lag or unresponsiveness may require re-pairing or a firmware update.
Common Troubleshooting Tips
- The LED strip doesn’t light up?
Confirm the power supply is functional and properly connected.
- Check polarity (positive and negative alignment)
- Ensure the voltage and current ratings match the strip requirements
2. Only part of the strip lights up?
- Revisit each connector or solder joint—look for loose or misaligned terminals.
- Examine the cut points; damaged copper pads can break the circuit.
- For long strips, voltage drop is likely—use power injection points or break into parallel runs.
3. Flickering or inconsistent brightness
- Check for inadequate power supply Power, especially under full brightness or white light modes.
- Inspect connectors and wires for corrosion, bending, or poor contact.
- Avoid running low-voltage strips (e.g., 12V) for long distances without reinforcement wiring.
- Wrong or distorted colors (RGB strips)
4. Wrong or distorted colors for RGB strips
- Make sure the controller matches your LED type (RGB, RGBW, etc.).
- Double-check pin-to-pad alignment when connecting segments.
- Replace faulty ICs or controllers if color distortion persists across multiple segments.
Step 11: Maintenance and Safety Tips
To ensure your LED strip lighting remains safe and efficient over time. Here’s how to ensure safety and extend the lifespan of your LED Strip:
Inspect wiring and connections periodically for damage, corrosion, wear, or loose connections. Early check-out can prevent system failure or electrical hazards.
Keep the strips clean: Clean the LED strips gently with a soft, non-abrasive cloth to maintain brightness.
Keep strips away from flammable objects: Avoid placing strips near flammable material or in sealed, unventilated locations. Excessive heat can degrade performance or pose a fire hazard.
Power off before making changes: Always disconnect power before performing any repair or adjustment work
For outdoor Installation, regularly check that all silicone seals, junction boxes, and end caps are intact to keep moisture out and preserve the IP rating
Conclusion:
Installing LED strip lights is a relatively straightforward process, but it requires attention to detail at every step for professional results. If you’re looking for an easy way to install LED strip lights, consider Sunroleds brands like. It offers simple LED strip light kits that include a power adapter, controller, and lights all in one package for effortless installation. While purchasing all the components and installing the lights yourself can be a rewarding challenge, our LED strip lights is an excellent choice for those who prefer a High-quality solution for buying and installing lighting.